The eminent gardener Gertrude Jekyll said…it takes “half a lifetime” to decide what’s best worth doing in a garden, and another other half to try and do it. She was a quick study, of course. Most gardeners take a full lifetime to discover what’s worth doing, then run out of time.
Henry Mitchell
If you are a novice gardener, or even a gardener with some experience but you want to renovate/start over on your existing landscape, Ol’ MrVintageman is here to help you get started. Before I go on, however, I just want to say take any advice I suggest with a hearty helping of salt.
For you see, I have no formal education or training in garden design or landscaping. I am not a Master Gardener: Master Gardener – American Horticultural Society (ahsgardening.org) Hell, I haven’t even worked in horticultural industry in any capacity.
For you see, I am no expert. I am mostly self-taught, gaining knowledge by books and magazines, tv-shows, and attending a few gardening classes at the local city recreation centers or nurseries. But I’ve learned using the old-school method by doing. I’ve got 30 years of hard-earned gardening experience under my belt. And I do mean hard-earned! I have made more boneheaded mistakes in creating the Vintage garden than you can count with an abacus.
So save yourself some time and money, and learn from my errors.
But first…
With that heads up out of the way, let me start off by saying that before you ever pick up a shovel or run out to buy plants, you need to figure out a few things first. This, unfortunately, is going to involve the use of your noggin.
The first, and probably the most important question that needs to be answered, is what are you looking to get out of your garden? Is it primarily for growing vegetables and fruits? Or, are you looking for landscape you where you can relax after a long day at work? Maybe you have kids and/or dogs that need a place to play and explore. If you are not sure what you really want, I suggest maybe checking out some gardening books at your local library. Believe it or not, the Gardening for Dummies book is a very useful guide on getting started: https://www.amazon.com/Gardening-All-Dummies.
Here is a website that can also give you some ideas for many of the different gardening styles available: 36 Types Of Gardens Explained For Every Space And Purpose.
…and then…
Hold on, don’t take off your thinking cap just yet. Once you have an idea of what type of garden you want, you need to figure out what garden style you want. Perhaps an English cottage garden or Japanese Zen garden is your style? Or a more naturalistic garden that mimics nearby scenery is your thing? If you are leaning more toward growing produce, are you interested in Mediterranean herb garden, a French potager garden, or the more traditional veggie garden? Here is a quiz you can take to figure out your gardens style: Quiz: What’s Your Garden Style?
Ok, now you can get started!
So, now you can run out and buy some plants, right?
Nope. That would be a big mistake.
I would highly recommend you wait a year before you start making major purchases and overhauling your landscape. Use that year to really observe your yard and learn all its nooks and crannies. The most important thing you need to observe is where the sun strikes your landscape. And you’ll want to observe where the light hits in every season, not just summer. Plants have different light needs (more on the later), and you need to know just how much light is where.
As an example: south facing surfaces, be it fences, sheds or houses, are going to receive a lot of sunlight (unless blocked by trees or other buildings). North facing structures, on the other hand, are going to get much less sunlight, especially in winter. In winter, north facing areas in colder regions can be snow and ice-bound for weeks on end. This can be deadly to some plants.
East and west facing surfaces will get about the same amount of light, but their “microclimate” may be vastly different. East facing areas will receive light in the morning, which is usually during the cooler part of the day. West facing areas, on the other hand, will be subjected to the full force of the sun during the hottest part of the day.
Also, how much shade do you have? Is your landscape full of established trees and shrubs? Then you may have to go with shade loving plants. A new development or a landscape that’s a wide-open space with little to no shade available? Then you’ll be looking at more sun loving plants.
Soil is everything!
I also highly recommend that you get your soil tested. You can go about doing this in one of two ways. Purchase a soil kit from a local nursery or Amazon, or contact your local county extension office and ask for a kit from them. You can look online for your local extension.
The store-bought test will give you a general idea of what type of soil you have. The extension office usually gives you more information, such as the mineral content in the dirt, macro- and micro-nutrient levels, how much organic matter is available, and ph makeup of the soil. Both tests informed me that I have heavy clay soil. They don’t call the area I live in “bentonite (a type of clay) manors” for nothing. The extension office test also informed me that I also have alkaline soil. We will get to how to improve you soil a little later.
In the meantime, let me give an overly simple explanation of what the test results mean.
Soil type – soil exists on a sort of spectrum. On one end is light and loose sand. On the other end is heavy clay. Somewhere in the middle is loam, a blend of sand, clay and organic matter. It is the holy grail for gardeners, and like the grail, very hard to find. If you have loamy soil, you have won the lottery. Very few gardeners are so blessed.
Sand is made up of large and rough particles, which doesn’t bind together very well. The positive of sand soil is that it’s easy to dig and plants encounter little resistance spreading their roots through it. The downside is, because it’s so loose and free draining, it doesn’t hold on to water very well. This means plants need to be watered a lot if they’re going to survive. Sandy soils also tend to be low in nutrients.
Clay, on the other hand, is composed of small and smooth particles that like to clump together. If you’ve ever played with clay, you have seen this behavior in action. Clay holds onto water much better than sand, and usually pretty well stocked with nutrients. The downside is that too much moisture, be it in the form of rain or irrigation, can saturate the soil. This can lead to plants drowning or suffering from root-rot. Should the soil dry out, on the other hand, the clay turns into concrete. And working in dry clay soil is a chore for both man and plant.
The solution to both problems is the same: compost, compost and more compost. Aged manure and spagnum would’nt hurt either. Compost and manure are known as “organic matter”. Add organic matter to your soil, whatever type it is, and you get closer to that magical “loam”.
And understand, adding organic matter to your soil may not be a onetime thing. In the case of veggie gardening, you will probably need to add it to your garden every year.
Soil ph.
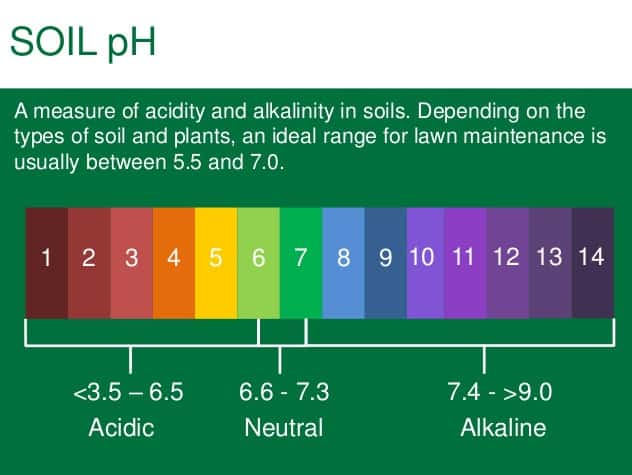
Harken back to your middle school science classes, when you learned about how acidic or basic a water solution is. Ph is measured on a scale from 0 to 14, with 0 being the most acidic (battery acid) to 14 being the most base or “alkaline” (liquid drain cleaner), with a score of 7 being neutral.
Garden pros talk about soil being “sweet” (alkaline) or “sour” (acidic). A great many plants prefer to grow at about a 6.5 ph. But almost all plants can tolerate a certain amount of sweet and sour, and some plants have adapted to actually prefer to grow on one side of the scale of the other.
You can alter how sweet or sour your soil is to a limited extent. If you have acidic soil, you can add limestone to the soil to nudge it a little bit toward the alkaline side. Conversely, if you have alkaline soil, you can add sulphur to add a bit of acidity.
I want to stress one thing about soil ph. You can only modify it a little, but ultimately the soil will revert back to its original level one you stop putting amendments into it. If I were to put an acid loving azalea in my alkaline soil, no matter how much sulphur I put down, I will not be able to change the soil enough for that azalea to truly thrive.
Let me give you an example. Years ago, I planted an Amur maple (acer ginnala), a tree that hails from Asia and is reputed to be pretty drought tolerant. It also has outstanding red fall color, which gives it another name: flame maple. According to my local county extension office, in some places in Colorado it is prone to chlorosis (more on that in a bit) if planted in alkaline soils.
I decided to chance it, and at first my gamble paid off. But as the tree matured, I became aware that some leaves of the tree were turning yellow and curling up. This condition got worse every year. Turns out, that is a classic sign of chlorosis. You see, in alkaline soils iron is converted into a form that some plants cannot readily use. If the plant can’t take up iron, its leaves turn yellow, and its growth becomes stunted. Eventually, it will probably die.
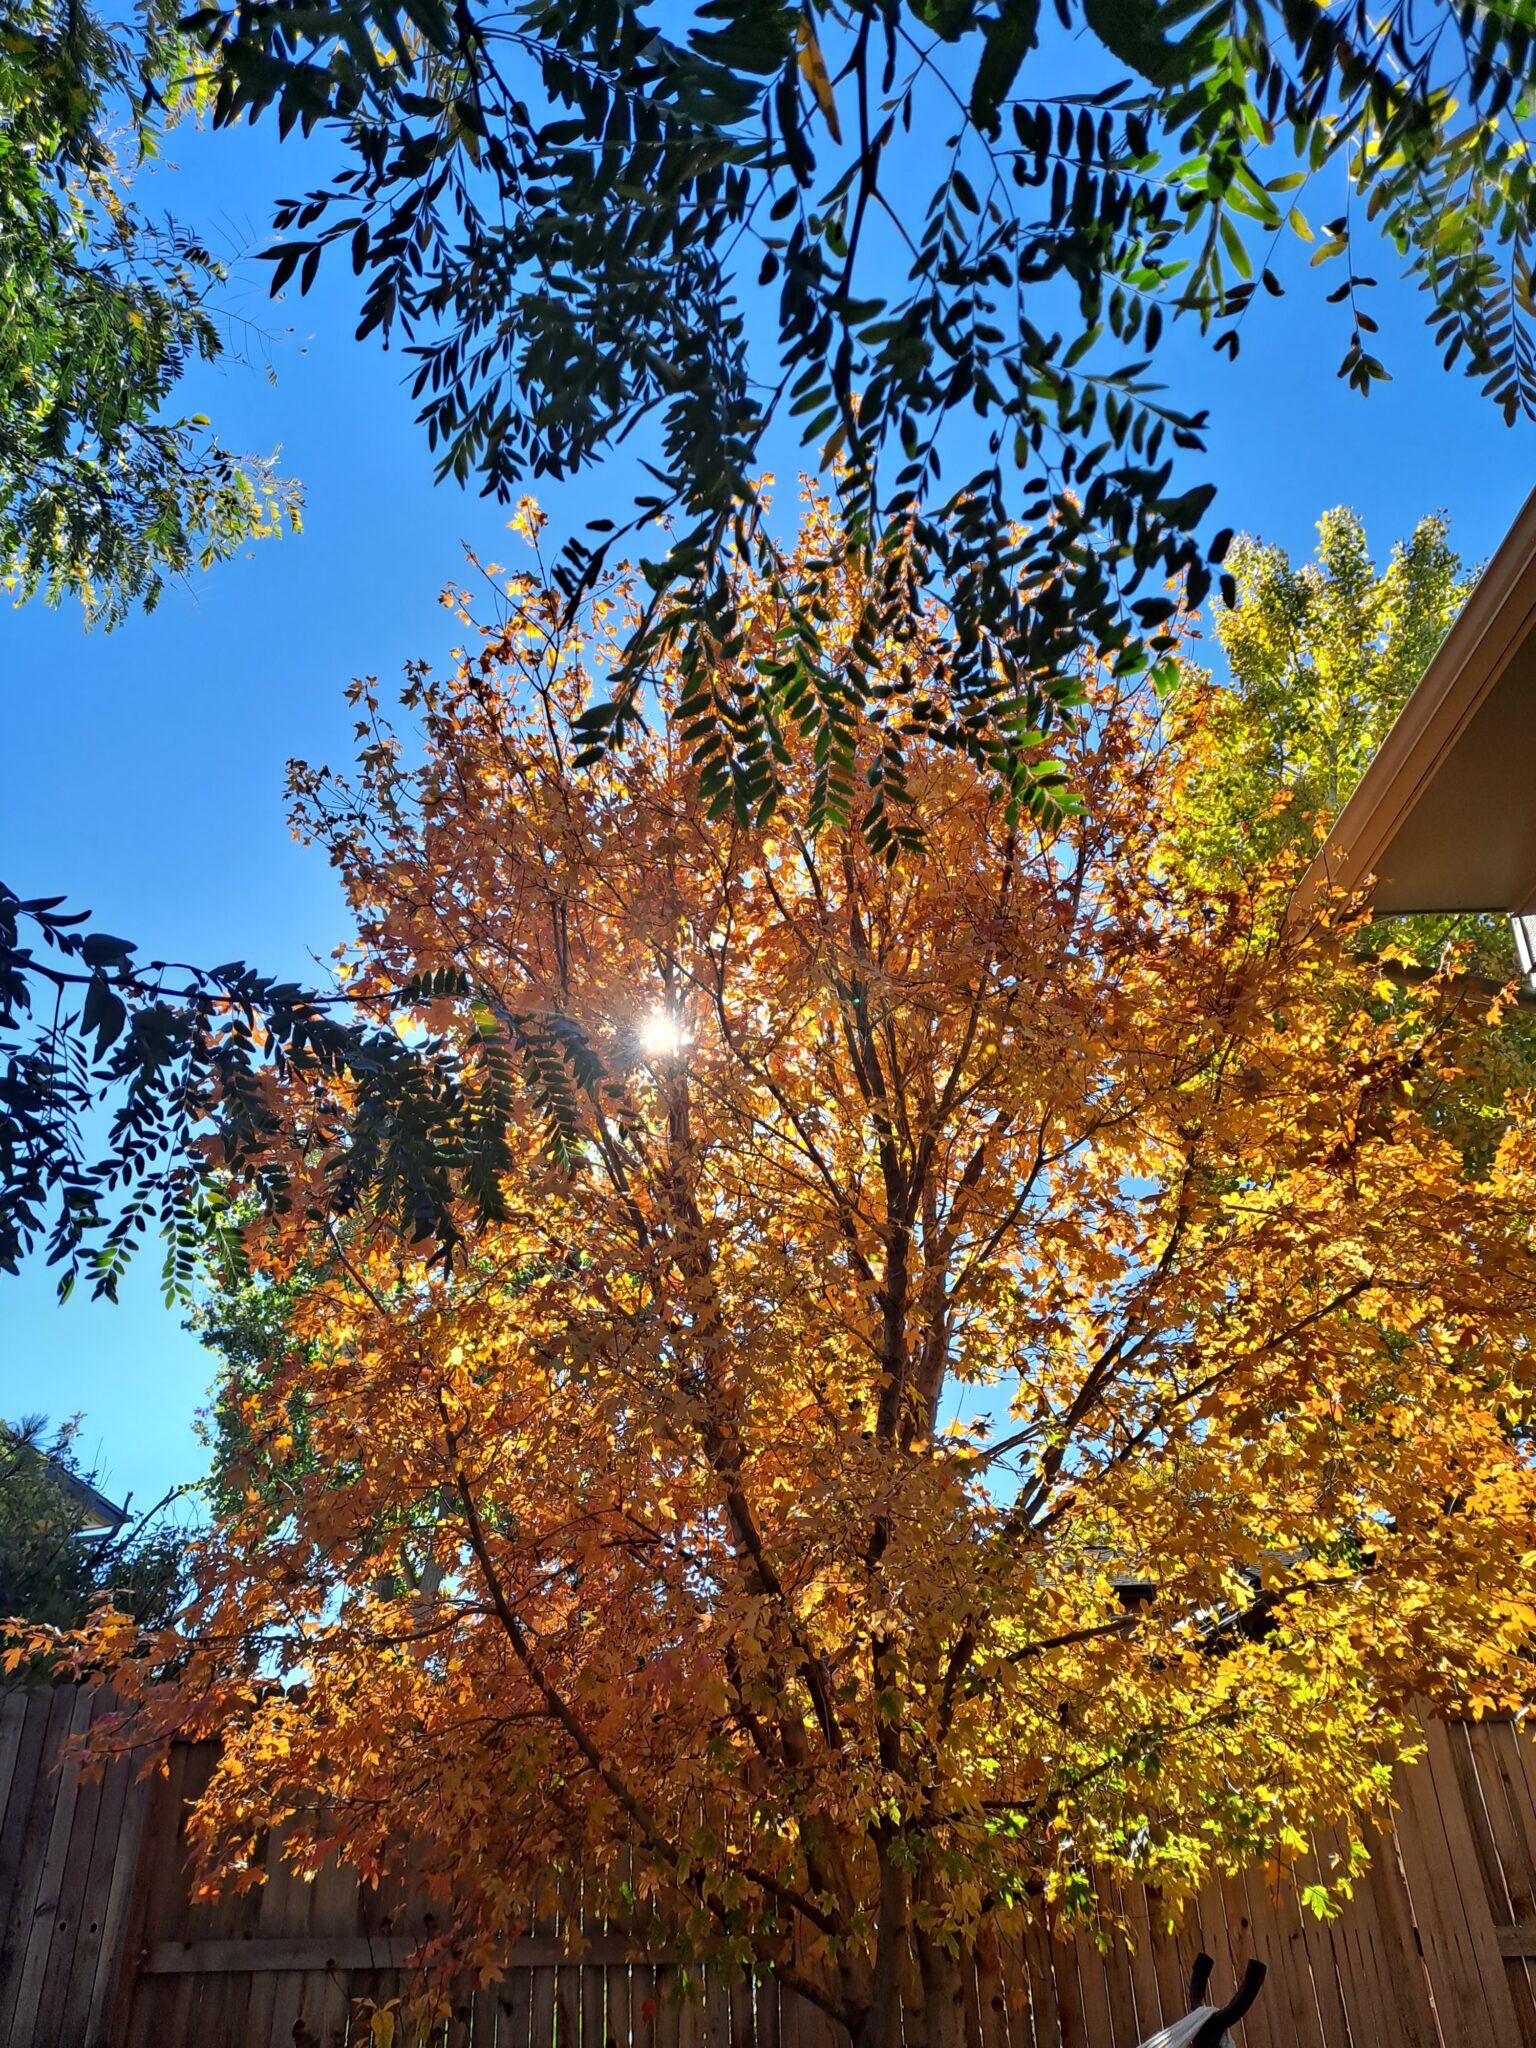
I scratched in loads of sulphur and compost in the soil around the tree and used an iron foliar feed every spring. The tree would rebound briefly, then get sick again. I finally bit the bullet and dug the poor thing out. I replaced it with a western U.S. native, the Bigtooth maple (acer grandidentatum), that is adapted to my growing conditions.
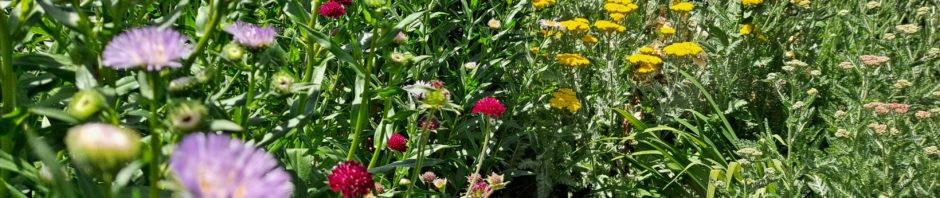
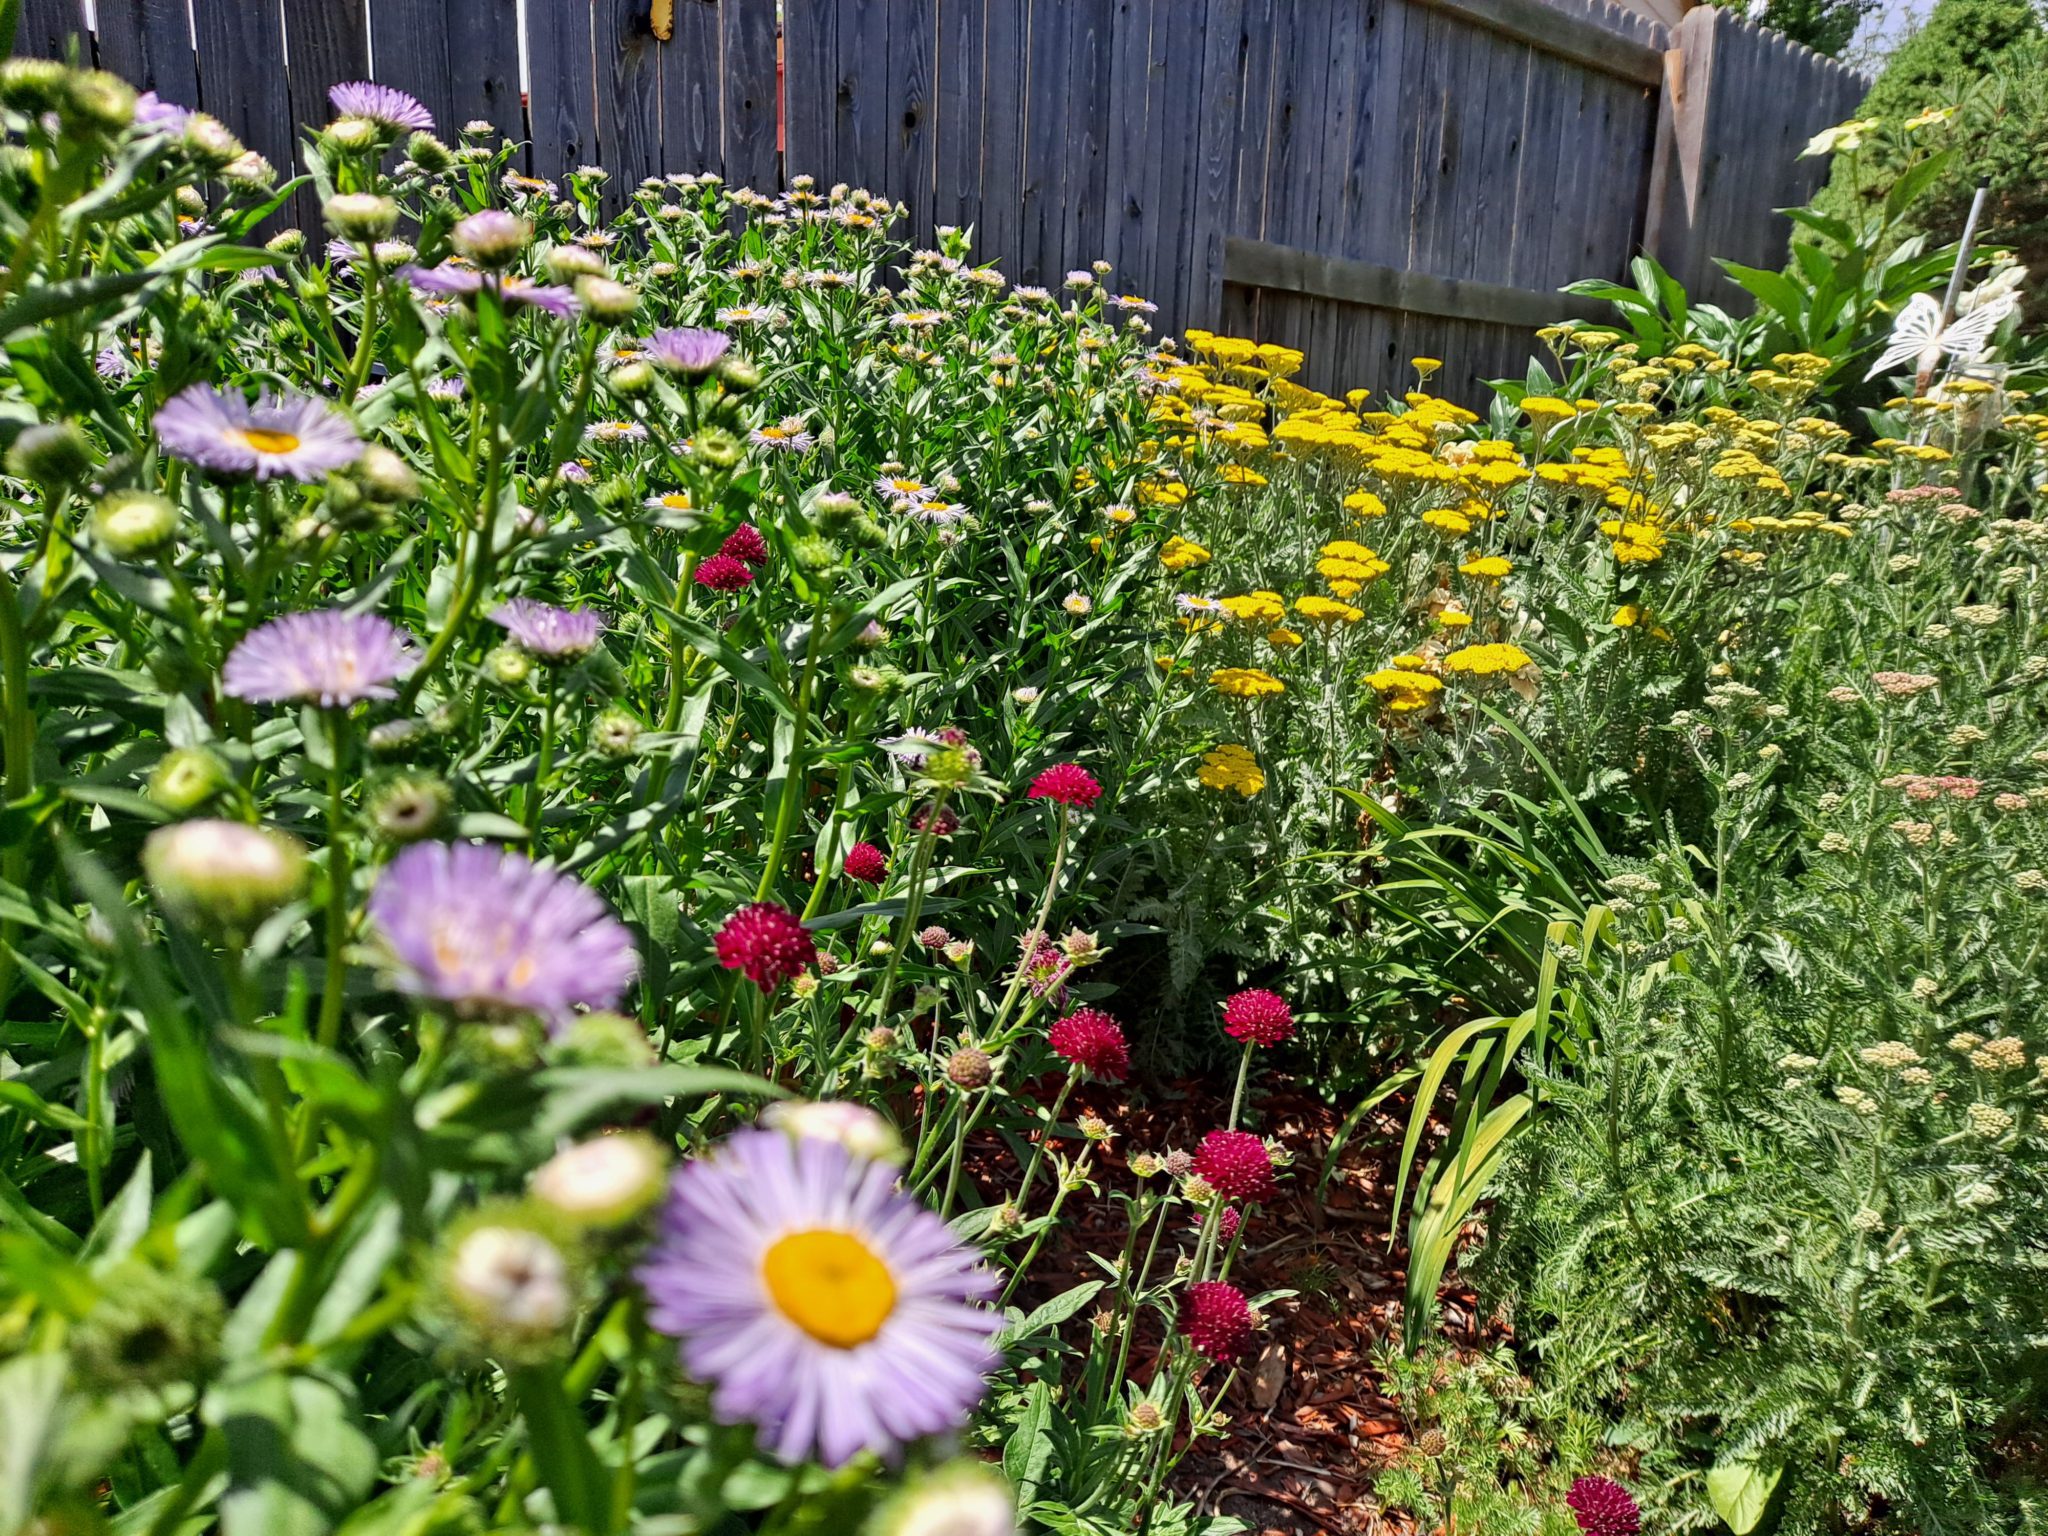
And as you can see in the photo below, it is doing great. You’ll hear the phrase “right plant, right place” quite often in your gardening journey. This is just one example of proving that adage true.
Have a plan.
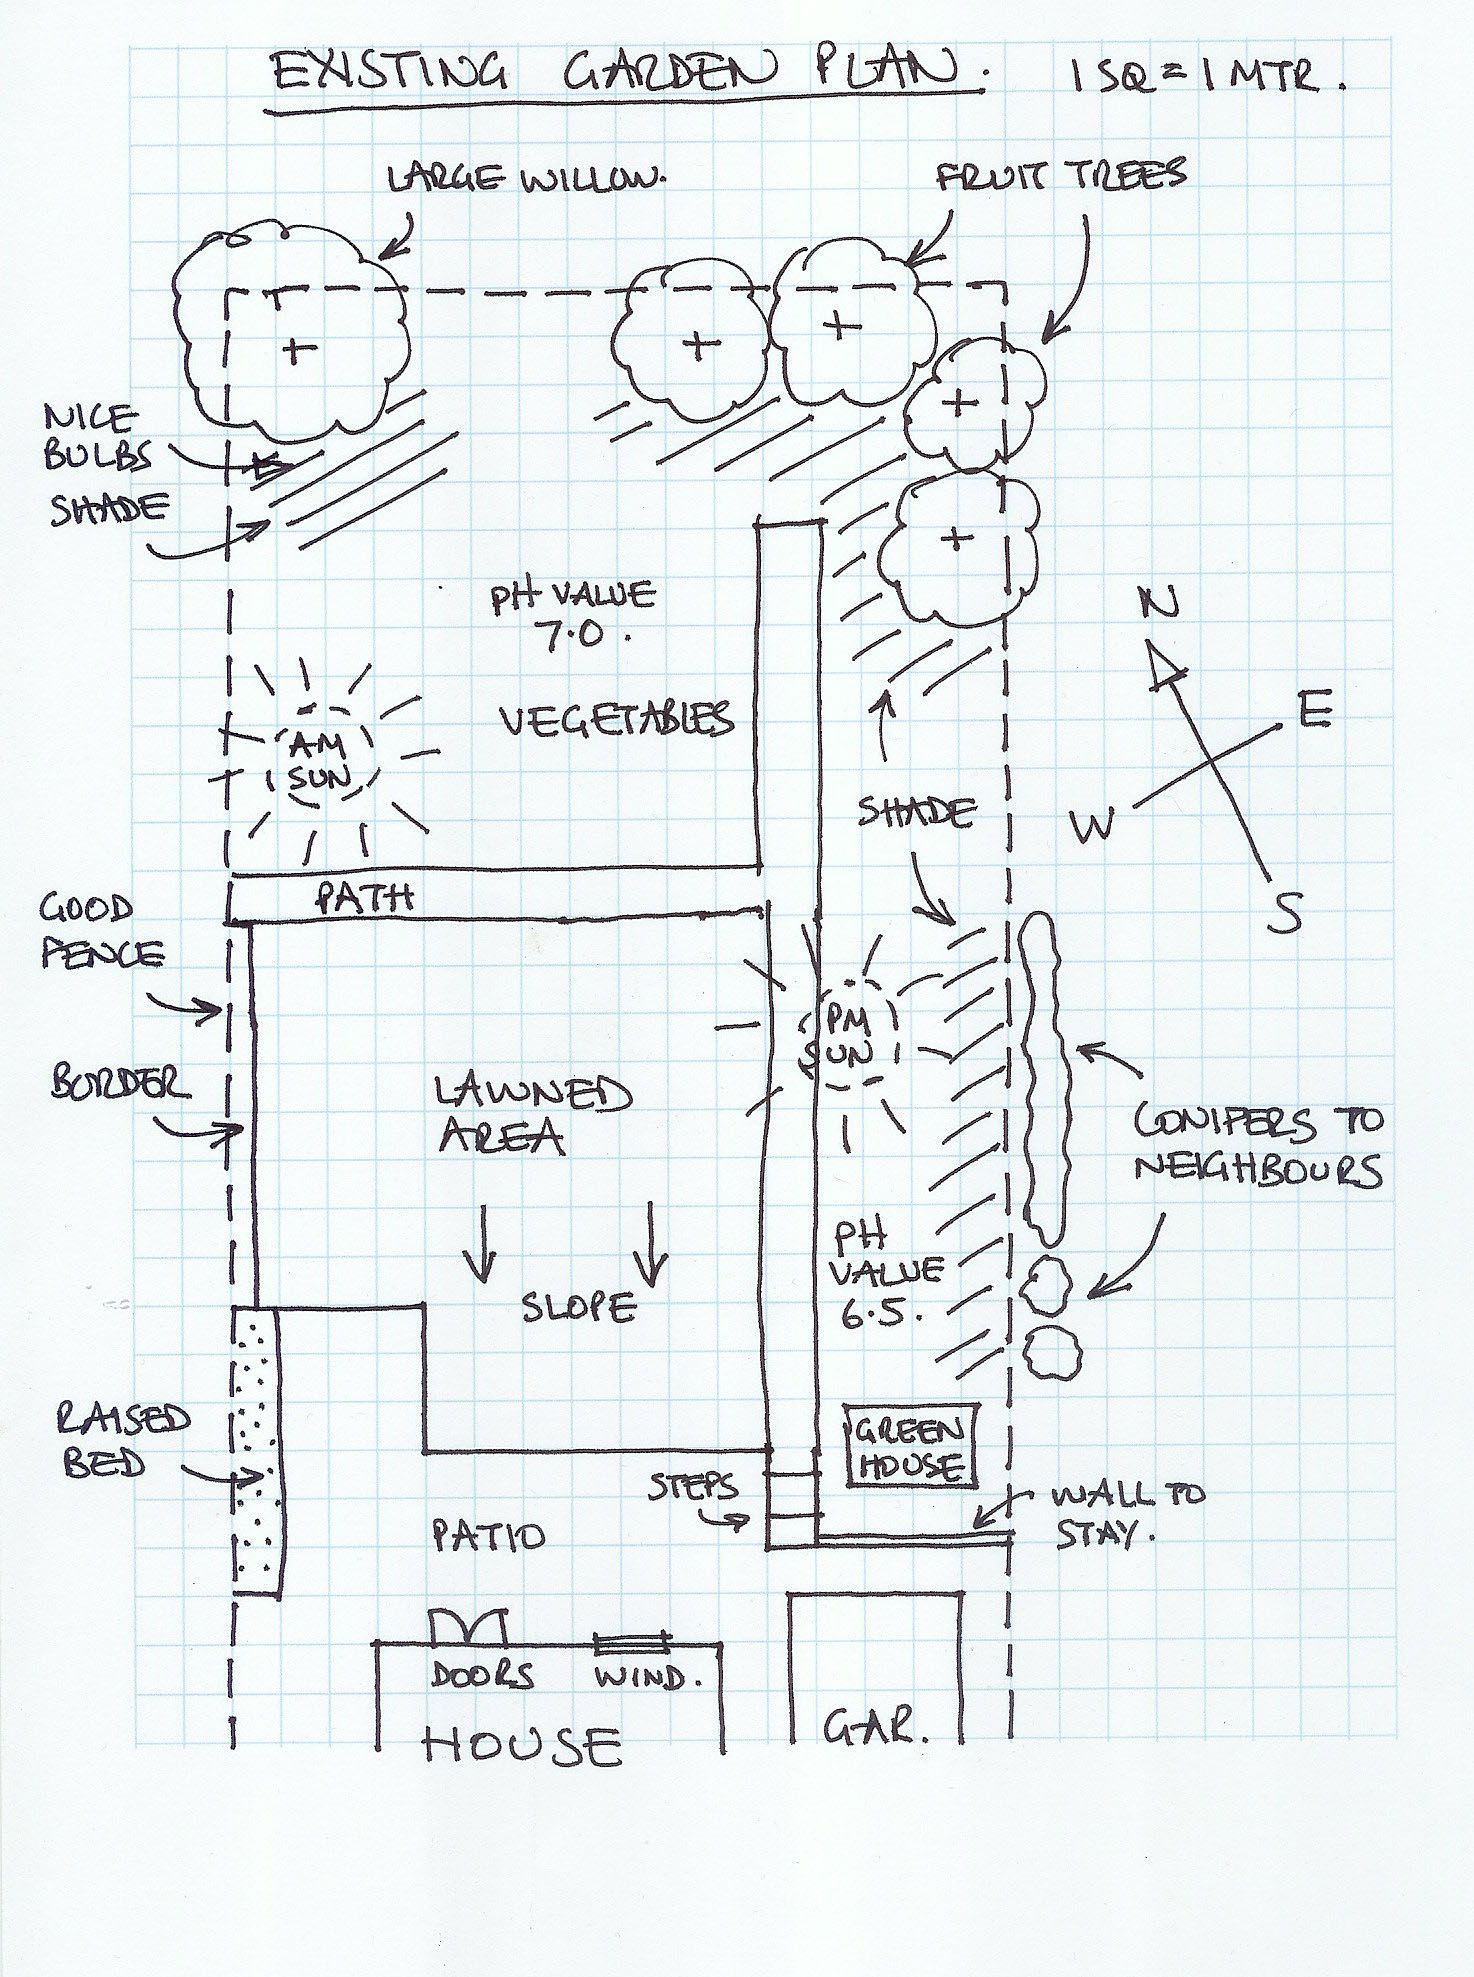
Way back when I first started gardening, I knew I wanted a low-maintenance and low-water landscape. Fortunately, the city in which I live offered classes on xeriscaping for a nominal fee. As part of the deal, the instructor would help us design our landscape. We had to make a copy of our land plat and take several panoramic photos of both the front and back yards. This was in the days before digital cameras, so I picked up a disposable panoramic camera from a local camera shop. When we finished the final class, our “diploma” was our landscape design.
Truthfully, not much of the Vintage garden matches up to that early design. Conditions in the yard changed, my tastes changed, and with the Vintage daughters grown and out on their own, our needs changed. A design is just a starting point. But an important one, because it allows you to start creating the “bones” of what will become your own little Garden of Eden.
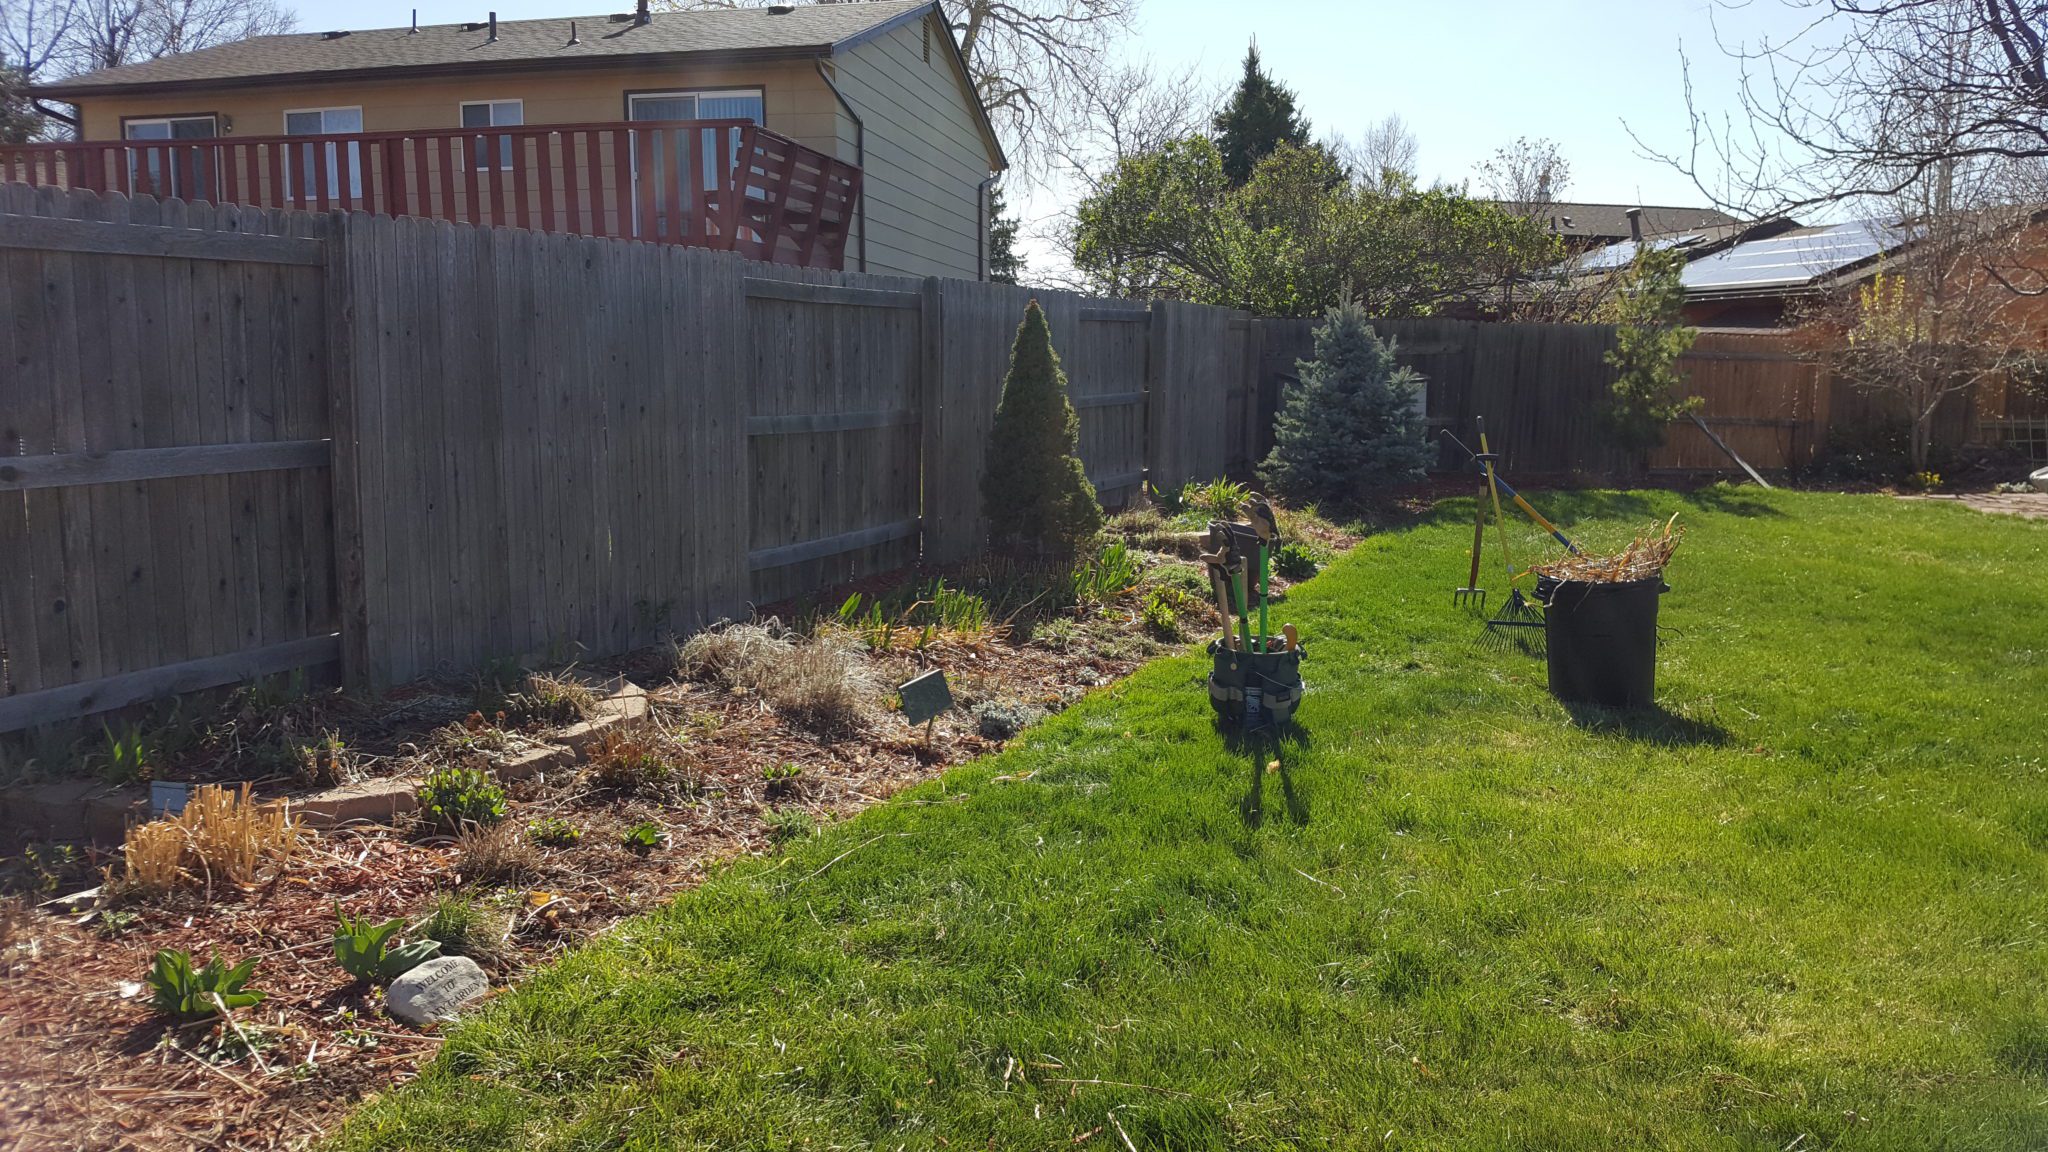
You don’t need a in-depth garden design to get started. Sure, you can hire a landscape designer if you want, but you don’t have to. You can come up with one on your own. Draw a rough outline of your property. Put down a compass showing the direction your property faces. Make big circles inside the borders to show what you hope to get of your outdoor living space. Perhaps this big circle of here, that gets 8 hours of sun and is near the water spigot, would be good place for a veggie garden. And the big circle in the middle can be lawn, so the kids have someplace to play football or soccer, and the dog has a place to evacuate bodily wastes. Out the back door, perhaps you want an attached deck with an outdoor kitchen. And over there, around the side of the house, would be a great place for a compost pile. In the front, which faces north, that area could be for shade loving and cold tolerant plants.
You get the idea. And feel free to dream big. You may not get everything in that you want, but at least you have a blueprint to get an idea of what is important to you.
Oh, and make sure you put in your design items that are already installed, such as big trees, shrubs, and hardscaping like decks, fences and gates, decks, patios, sheds and so forth. Down the road you can move, replace or tear these things out if you want. But you need to know where you are at before you can get to where you want to be.
Believe me when I say that having even a rough plan can save you a lot of money and time in the long run.
How much work are you willing to do?
As a novice gardener, you will sometimes hear or read that a plant is “low-maintenance”, or that a landscape is similarly referred to as “low-maintenance”. Let’s be clear about this term low-maintenance: it is a matter of perspective. There is no such thing as a no-maintenance landscape or plant. Oh, I suppose you could install artificial grass, or even pave your outdoor area completely over. But it still wouldn’t be no-maintenance. You would still need to sweep dust and leaves off, and repair the wear and tear bound to occur.
So just be aware that there will be a certain amount of work involved in gardening. How much work you are prepared to put into it depends on you. You will be weeding, watering, pruning, digging, doing spring cleanup and winter prep in the fall. So start small, and see if you can handle what you have before going bigger.
For all the grief it gets in some quarters, a lawn with a few trees and shrubs scattered around can actually be a relatively low-maintenance option. Sure, you have to mow and edge it almost every week, and for a really nice lawn you’ll want to fertilize it once or twice a year. Water regularly and stay on top of the weeds of course. But the work itself is pretty straightforward. It’s not very lively, but if you like it, who cares? It’s your garden. I still baby the remaining lawn in the backyard to this day.
A veggie garden, on the other hand, is pretty labor intensive. Constant weeding, lots of watering, dealing with bugs, diseases and four legged pests. By pests, I am implying squirrels and bunnies, but your own pets can wreck havoc on you veggie plot). However, the payoff in eating your own produce cannot be measured in time or money. There is no comparison to the flavor of a homegrown tomato. Even the ones you can get from a farmers’ market cannot equal the ones you grew yourself.
Just be aware that you probably aren’t saving all that much money over buying in the grocery store. Check out this humorous book called the $64 Tomato about one man’s trials and tribulations growing his own veggies: The $64 Tomato: How One Man Nearly Lost His Sanity, Spent a Fortune, and Endured an Existential Crisis in the Quest for the Perfect Garden.
The work you put into gardening can reward you both physically and mentally. All I’m saying is, take into account how much work and time you can truly afford.
Find your hardiness zone.
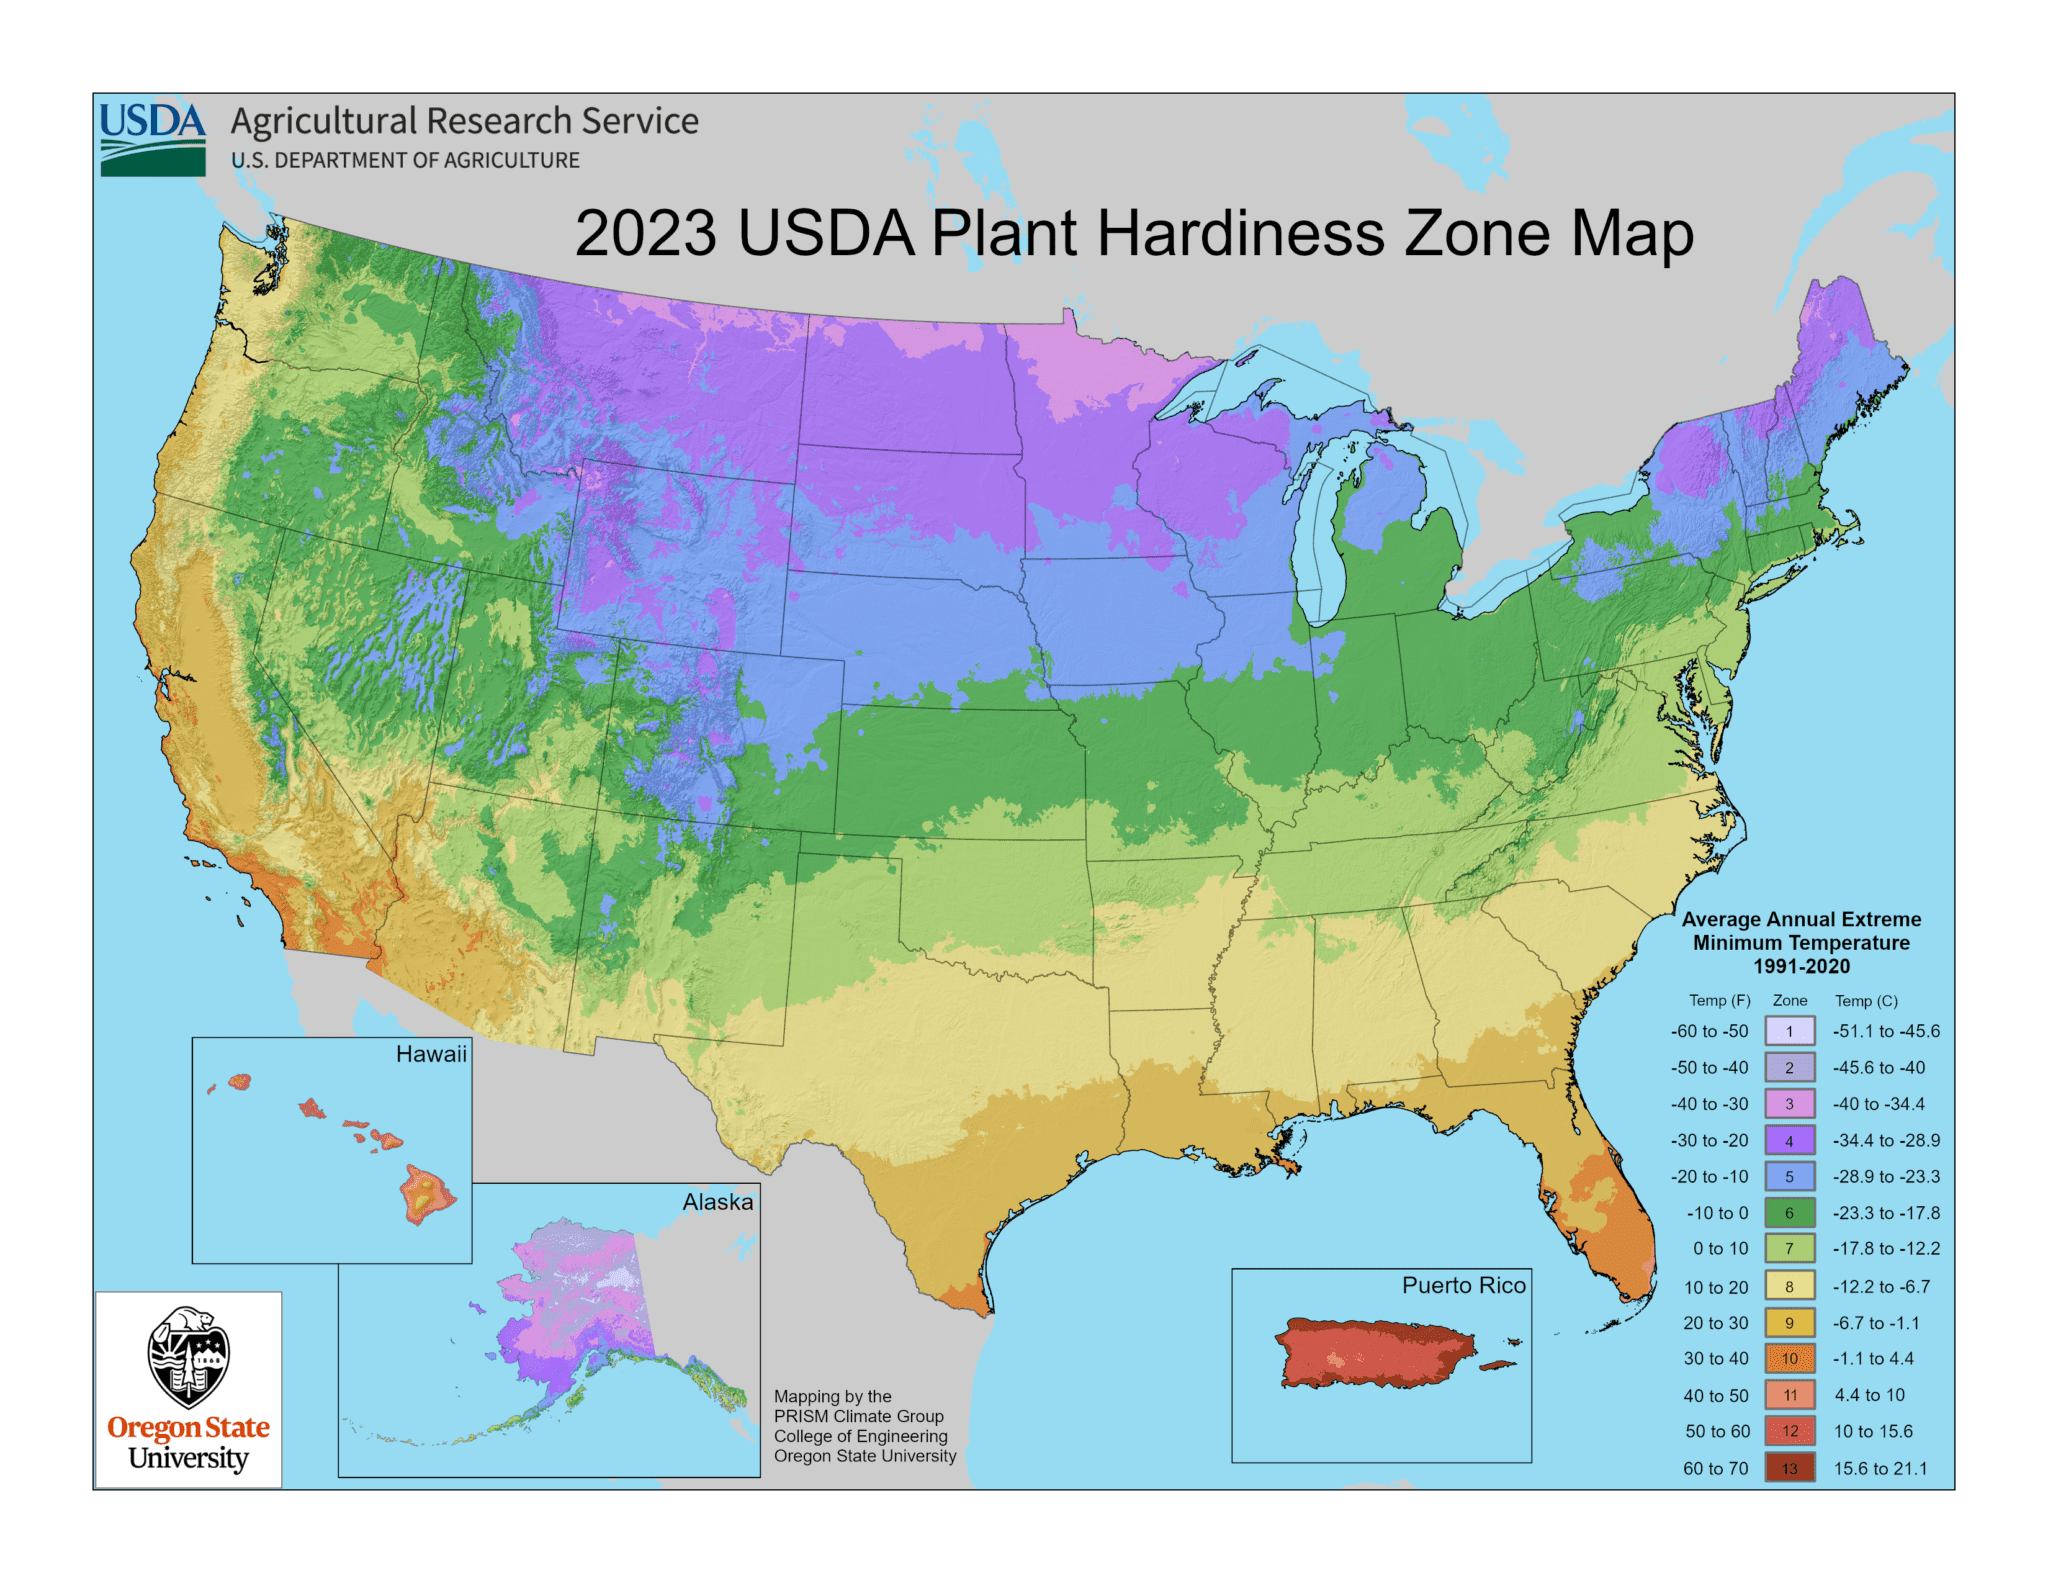
The United States is a vast country. It is so vast, it encompasses almost every climate and terrain known to man. It reaches from the arctic circle to the tropics; within its boundaries you will find forests, mountains, deserts, coastal shores and more. There is no one plant that can thrive in every part of the nation. So United States Department of Agriculture (USDA), has divided the country into “hardiness zones”. These zones depict what the lowest likely temperature might occur there during the winter. See the map above.
Plant breeders determine how much cold a plant can endure and still survive. This information goes out to wholesalers and nurseries that such-and-such plant is hardy from zones x-y. This information is usually put on a plant tag so the buyer knows the plant should be alright for that locale.
Here’s how it works: I live in zone 5b, so theoretically plants that are hardy to zone 5 should survive in my climate. When I go to buy a plant and the plant tag states that the plant is hardy from zones 4-8, I can feel fairly certain that it is hardy to my area. On the other hand, should the tag say 7-10, then I know that I should treat that plant as an annual, and not expect it to survive the winter.
HOWEVER, this zone map is just a guideline. Every single garden in the world has micro-climates that veer from the norm. Remember earlier when I talked about where the sun strikes can change your garden conditions? A south facing brick wall that gets hit by the winter sun all day could possibly survive up to one or two zones warmer than what it’s rated for. This is an example of a micro-climate.
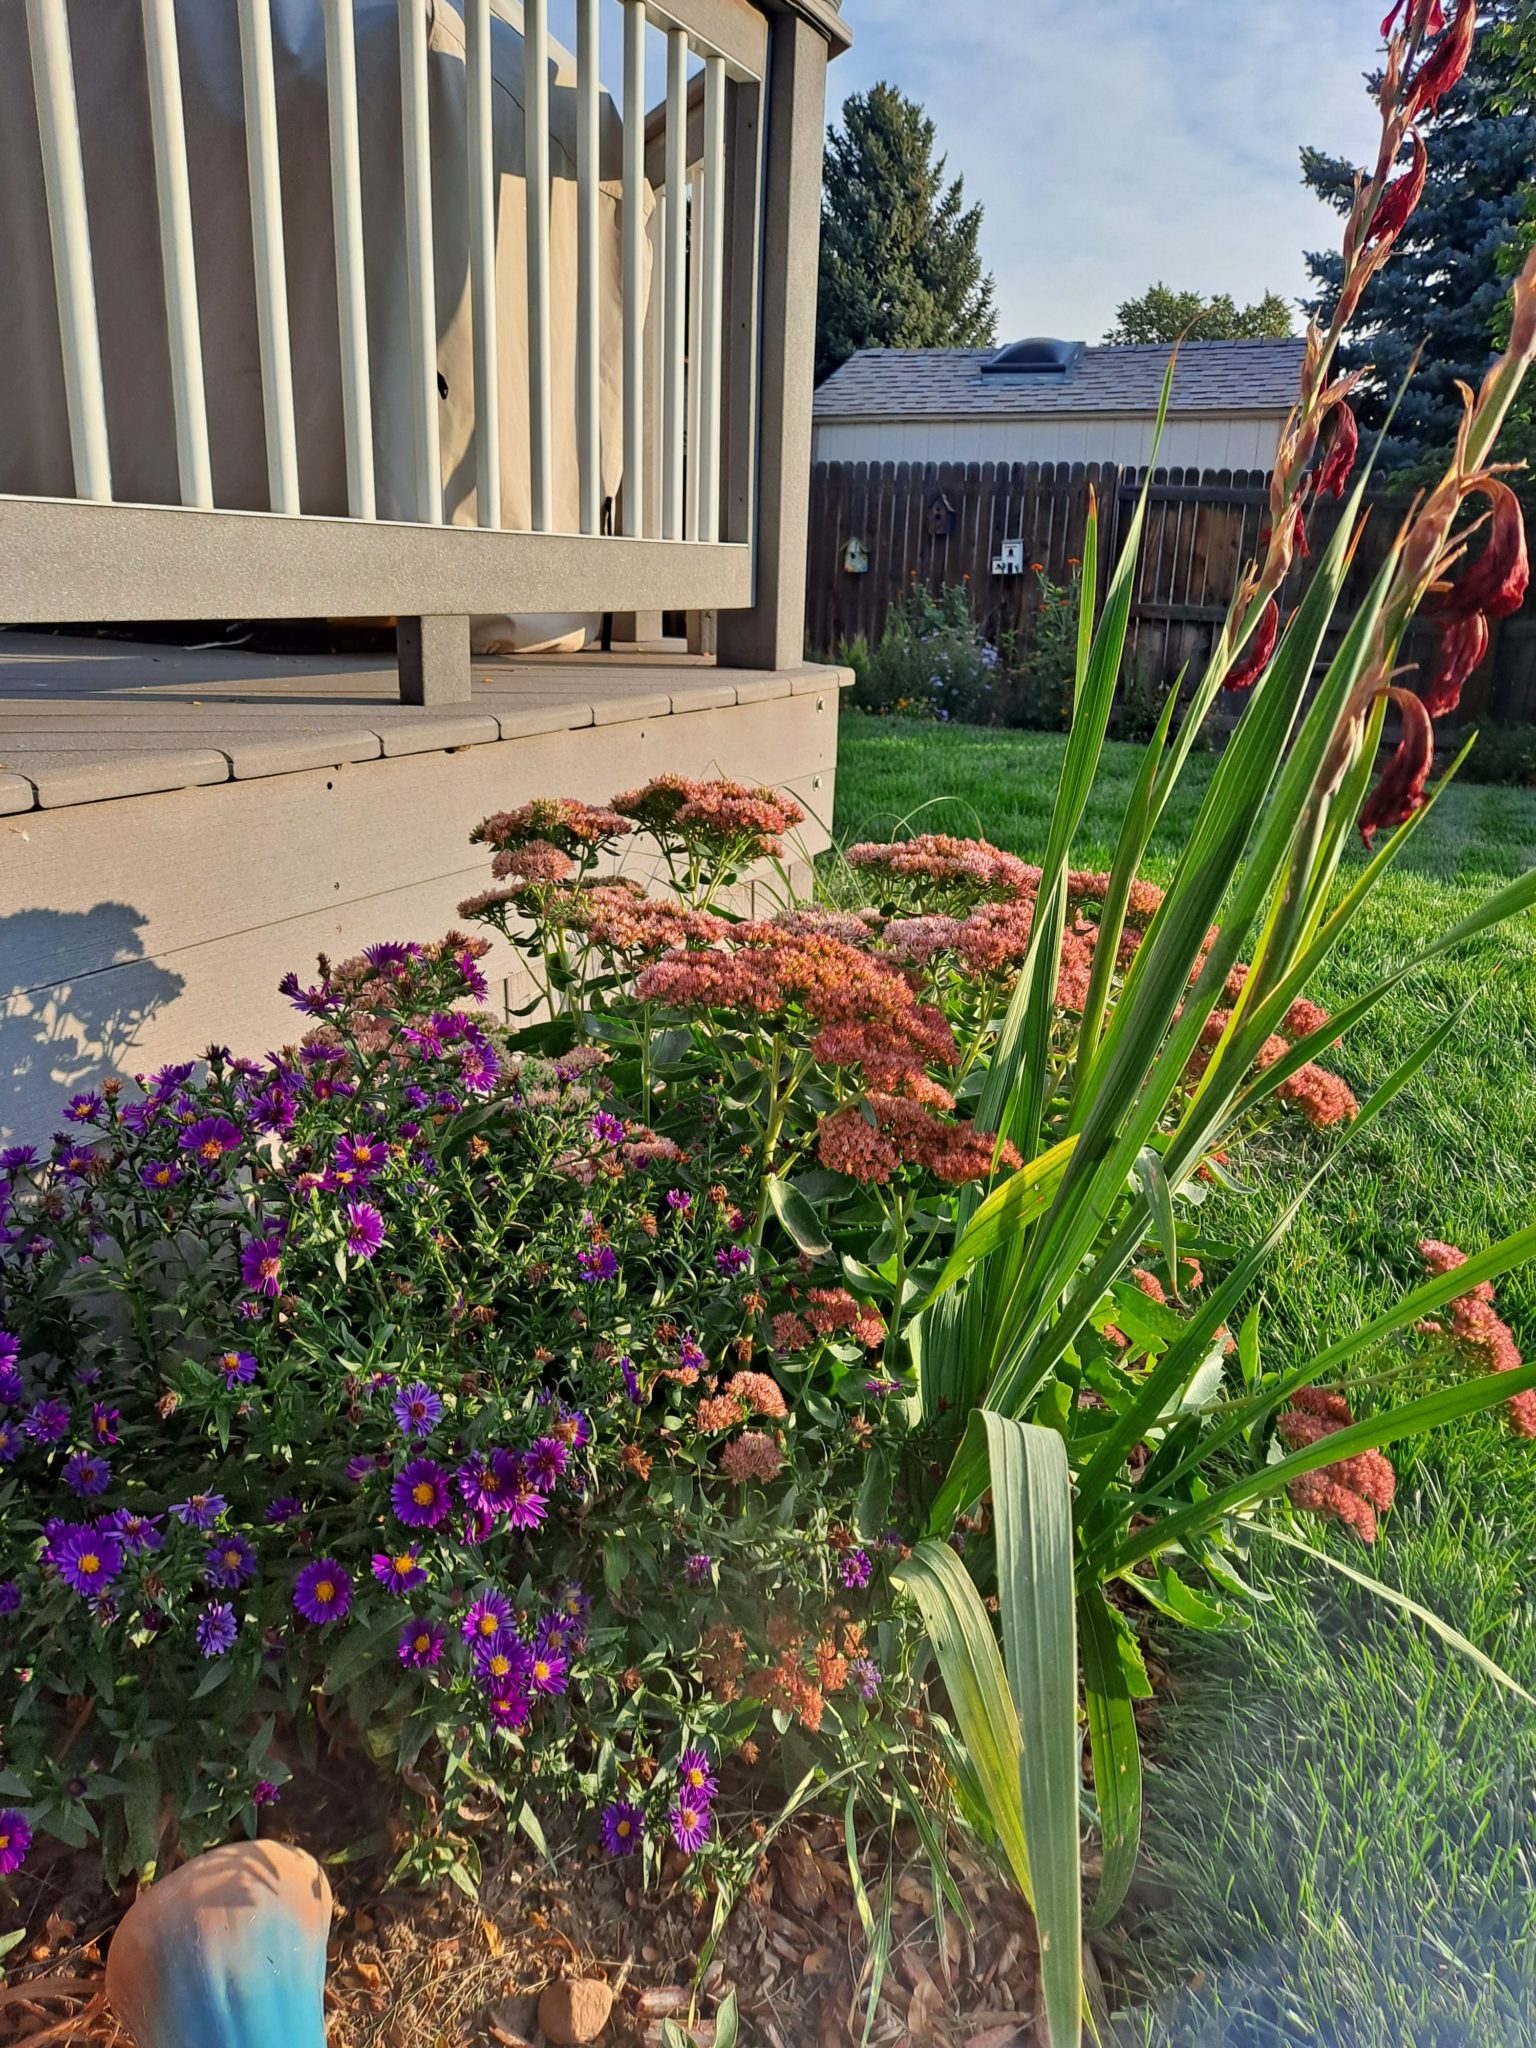
In the picture below you can see the fading remains of a gladiolus plant. I planted these gladiolus bulbs at the base of our deck many years ago. The border faces east and gets at least 5 hours of sunlight during the winter. Gladioli bulbs are usually only hardy down to zone 7, and yet the plants come back to my zone 5 garden every year! They don’t always bloom , but they reliably reappear every summer. I wish I could say I planned this, but that would be a lie. I put the bulbs in one year and treated them as an annual. Imagine my surprise when they kept coming back.
The lesson? Hardiness zone maps are a useful tool, but they are not exact. You can sometimes push the limits of a plant’s hardiness under the right conditions.
To be continued…
When I first started writing this post, I initially thought it was just going to be a few small observations. It’s now a lot bigger than I planned, and I’m only at the halfway point! I’m going to stop here. I will post the rest of my unsolicited advice in a few days.
Coming up…plant requirements, plan for the future, and acquire patience RIGHT NOW!